RedFox Merchant Dashboard User Guide
Thank you for choosing RedFox POS. To get the most out of your merchant account, please take time to review this document. This document contains all essential information for the user to make full use of the RedFox Merchant Dashboard.
To access the RedFox Merchant Dashboard, go to the website https://admin.yourfoodorder.com/ and enter your user name (usually an email address) and password.
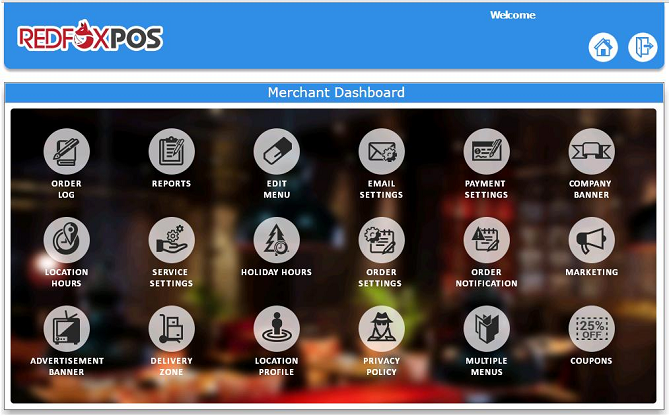
ORDER LOG

The Order Log displays all orders placed within a given date range. If no date range is entered, the order log will display only orders from the current day by default.
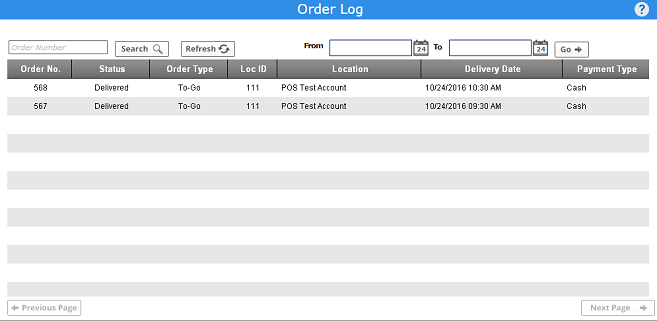
Order status are described as follows:
Pending Orders: Orders waiting to be printed.
In Preparation Orders: Orders that are currently being prepared by the kitchen.
On The Way Orders: Delivery orders that are enroute to the customer.
Ready Orders: Orders that have been prepared and ready to be served or handed to the customer or delivery driver.
Delivered Orders: Delivery orders that have been completed and delivered to the customer.
Printed Orders: Orders that have been sent to the kitchen printer.
Future Orders: Orders placed more than 2 hours ahead of time to be prepared later.
Voided Orders: Previously placed orders that have been canceled (voided) for any reason. Orders can only be voided with a manager or assistant manager passcode.
Order types are described as follows:
Dine In: Orders intended to be served to and eaten within the dining establishment, these orders are typicaly taken and served by a waiter.
To-Go: Orders typically placed by a walk-in customer, intended to be packed up and eaten outside of the dining establishment.
Pick Up: Orders typically placed via phone or internet, intended to be picked up and eaten outside of the dining establishment.
Delivery: Orders intended to be delivered to a specified address by an employee of the dining establishment.
REPORTS
The following reports are available through the merchant dashboard:

Customer Orders: Customer order report will allow searching for orders by customer name or order type. Click on desired order to view details.
Merchant Invoice: Merchant Invoice report shows daily and monthly fee detail. Fees and fee schedule vary depending on program selected at time of activation.
Future Orders: Future order report will display all orders placed to be prepared at a later time.
EDIT MENU
Edit Menu tab is where you create new menus and edit existing menus.
1. CREATE NEW MENU: Typical examples of a multi-menu setup would be a Breakfast menu, a Lunch menu and a Dinner menu. You may also wish to add a Catering menu, a Kids menu or decide to just have one menu.
Select "Create Menu" located near the upper right of the Edit Menu screen to create a new menu.
Once a menu has been created, select "View Category" next to the desired menu to add categories.
2. CREATE CATEGORIES: After a menu has been created, the next step is to add categories. Typical examples of categories would be Appetizers, Entrés, Sandwiches, Side Orders and Desserts.
Select "New Category" located near the upper right of the Categories screen to create a new category.
You must add the sizes that you want to be available for each item in the category. Only the sizes selected will be available when creating a new item to be listed under the category.
Once you have created the desired categories, you can then begin to add Items to your menu. Select "View Item" next to the desired category to add items.
3. ITEMS: Select "New Item" located near the upper right of the Items screen to create a new item. Be sure each item is added under the proper category.
Item Name: Name the item to be added, example: "Chicken Fingers".
Description: Describe the item, when possible, try to create a description that not only describes the item, but entices a customer to purchase the item. Example: "Our delicious Chicken Fingers are made with all-white meat chicken breast and our famous buttermilk breading, fried to optimum crunchiness and served with your choice of one of our amazing dipping sauces". A Menu full of well worded descriptions will help to increase sales and average order amount. Description limit is 255 characters.
Item Image: You may add an image for each item on your menu. Just like a well worded description, an enticing image will help increase online menu sales.
Min / Max quantity: Used if you wish to set a minimum or maximum quantity of the item that must be ordered.
Status: Active by default, you may make the item inactive to remove it from the menu.
Prices: Set the price for each size available for the item. Available sizes are set at the Category level. Only sizes that are assigned a price will be listed when viewing the menu online or on the POS terminal.
Days: Select the days of the week when the item is available.
Preferences: Choose the preferences (questions) that should be asked when an order for the item is placed. An example of a preference question for a steak would be Meat temp? Rare, Medium, Medium-well or Well done. To add a preference that is not listed yet, select "New Preferences".
Add Modifier: An example of a modifier would be Pizza toppings, Salad dressings or Burger/Sandwich toppings. To create a new modifier that is not already listed, select "New Modifier" located near the upper right of the Modifiers and Options screen to create a new modifier.
EMAIL SETTINGS

Email Settings will allow 2 additional email addresses to receive notification of all orders placed online. By default, the email address registered when activating the merchant account will receive these confirmations.
PAYMENT SETTINGS

Payment Settings is used to configure credit card processing. You will need the following information from your credit card processor to activate this feature: 1. Name of payment processor. 2. Login name. 3. Transaction key.
You must also select the credit card types that your merchant account will process (Mastercard, Visa, AMEX, and Discover).
COMPANY BANNER

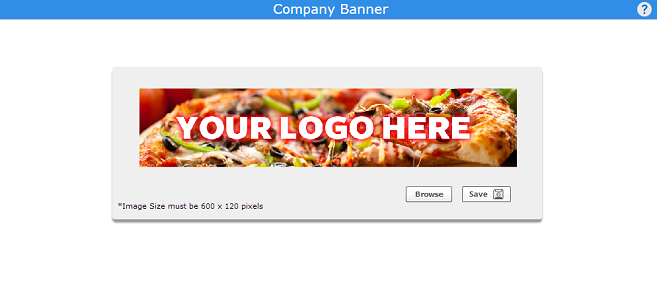
Company Banner will appear at the top of your online menu.
Banner may be uploaded form any PC.
Banner Size MUST be 600 x 120 pixels.
LOCATION HOURS

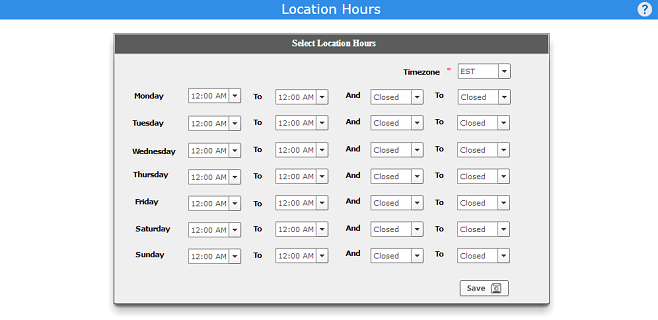
Location Hours will determine when the online menu is available. A second time slot for each day is available if (for example) your establishment closes after breakfast and reopens in the evening for dinner.
See also: SERVICE SETTINGS and HOLIDAY HOURS
SERVICE SETTINGS


Service settings will determine when each order type is available online. Separate settings are available for Pick-Up and Delivery. These settings are useful if you want to stop taking delivery orders (for example) 1 hour before closing or if your establishment is open for breakfast but you do not offer delivery until lunch time.
HOLIDAY HOURS
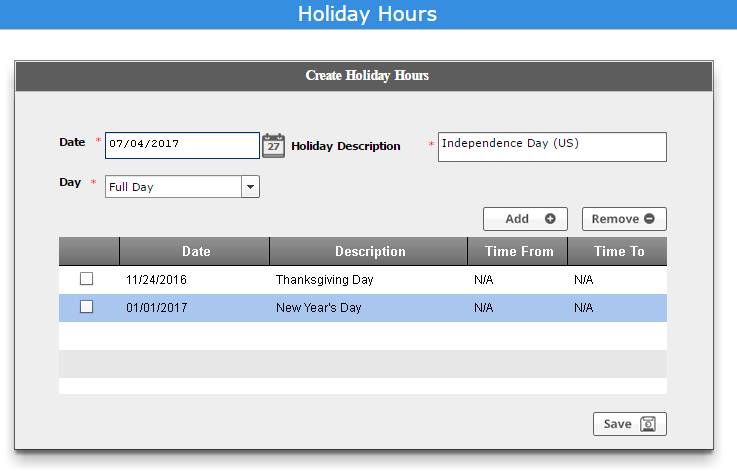
Use holiday hours feature to configure days when your establishment will be closed. This feature will automatically disable the online menu for those days and hours selected.
1. Enter date and description of location holiday/closure.
2. Enter full day or partial hours and menu will be taken offline during the set time period.
3. Select SAVE at the bottom right corner of screen.
Repeat the above steps for each holiday entry.
If your establishment will be closed for several days in a row, you must create a separate entry for each day the establishment will be closed.
ORDER SETTINGS
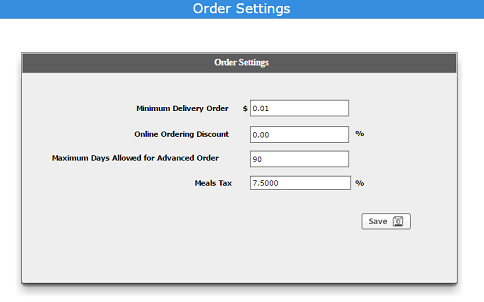
You may configure the following settings under the Order Settings tab:
Minimum Delivery Order: Enter the minimum delivery order amount required for delivery services
Online Ordering Discount: Online ordering discounts are applied to all orders and are calculated off the food total.
Minimum Days Allowed For Advanced Order: Enter the maximum number of days you will allow for advanced orders.
Meals Tax: Enter meals tax amount if applicable.
ORDER NOTIFICATION

Order notification tab is used to select how you wish to be notified of online orders.
Options are : Print, Email or FAX. You may choose 2 of these 3 options. You may also choose weather or not you wish to receive an SMS (text) message to your phone. *Service fees may apply.
MARKETING

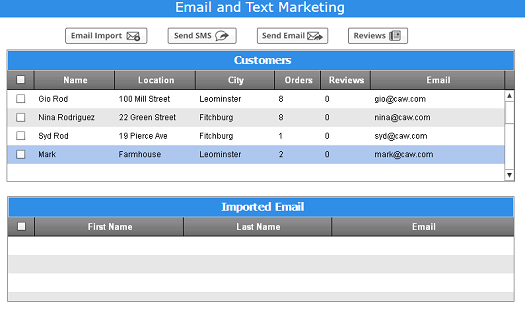
Double click on customer name to edit/view the customer details.
Marketing tab allows you to send SMS (text message) or Email marketing messages to customers. SMS messages are limited to 160 characters. Email messages are limited to 255 characters.
You also able to import other SMS and email addresses from a spreadsheet for marketing purposes.
Select each box that you wish to send a text or email message to.
ADVERTISEMENT BANNER
Advertisement banners allow you to add 2 images that will appear on the right side of your online menu page. Images can be uploaded from any PC.
Banner 1 (upper banner) dimensions must be 219 x 356 pixels and banner #2 (lower banner) must be 219 x 154 pixels.
Suggested use of this space is for images that will increase your sales. Examples would be advertising Free Delivery! or Buy One, Get One 50% Off! Alternatively, you could rent the advertising spaces to other local business such as a local plumber or electrician.
DELIVERY ZONE

Use the delivery zone map to draw out your delivery area(s). Multiple areas are allowed and separate delivery fees can be assigned for each zone.
 Use the map drawing control to draw out your desired delivery zone.
Right click on an established zone to define delivery fees and delivery zone description. Enter $0.00 for free delivery. Be sure to save map after drawing out your delivery zone before leaving the delivey zone page.
Zones cannot intersect or overlap. You may zoom the map in close to draw adjacent zones.
LOCATION PROFILE
Location profile contains the information for your establishment. Included info is Business name, address, and phone number. Also included on this page is your merchant ID number, Location ID number and the link address to your online menu.
PRIVACY POLICY

Most merchant processing agreements require a posted privacy policy if you have a website that allows customers to place orders online.
MULTIPLE MENUS
You will be able to create multiple menus. Common examples of a multiple menu system would be any or all of the following: Breakfast, Lunch, Dinner and Catering menus. Use the Multiple Menu tab to make previously created menus active.
To make a menu active, move the desired menu to the "Selected Menus" column on the right. Menus that are not selected will not be available or visible on the RedFox POS terminal or the online.
See "Edit Menu" to create new menus or to edit an existing menu.
COUPONS
The Coupons tab will allow you to create custom coupons and assign coupon codes for use by customers when placing online orders.
Coupon Code: Assign an alpha-numeric code for the coupon.
Coupon Type: Select which type of coupon you would like to create. The available options are:
Amount: Deducts a specific amount (example: $5.00 off)
Percentage: Reduces a the amount by a percentage (example: 20% off)
Item:
Description: Enter a short description of the coupon that you are creating.
Discount Assigned On: Assign discount based on total amount, item or category.
Minimum Order Amount: The minimum purchase amount required to qualify for the coupon discount.
Coupon Limitation: Allows you to limit the number of times the coupon can be used. Setting the limit at 100 will limit the coupon to the first 100 customers that use the coupon.
Locations: For establishments with multiple locations, this allows you to select which location(s) the coupon code is valid for.
Start Date / End Date: Coupon will become active on the start date, and become deactivated after the end date.
Unavailable Date: Allows you to deactivate the coupon code for specific days between the start date and the end date. Example: Valid for the month of December except Christmas Eve 12/24 and Christmas Day 12/25.
Time Table:
Always Open: Coupon code is valid 7 days a week.
Open Monday-Friday: Coupon code is valid Mon-Fri.
Custom: Allows you to set custom days and hours that the coupon is valid.


 Use the map drawing control to draw out your desired delivery zone.


